
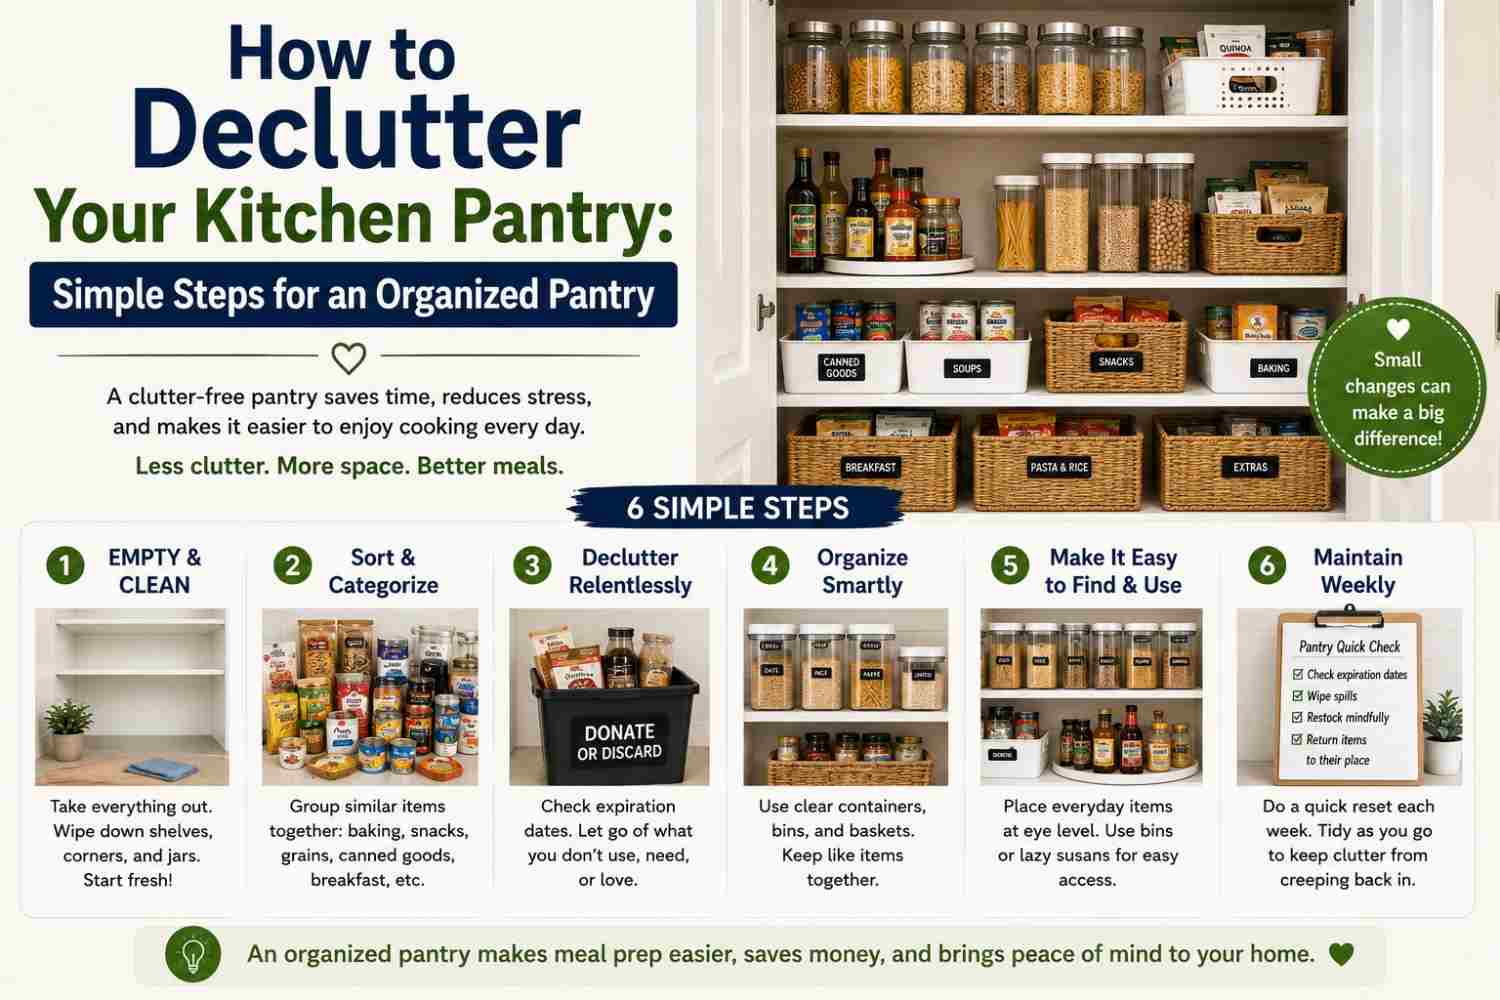
Pull open your pantry door right now and take an honest look. If what you see is a collection of items stacked in front of other items, expired products you have been meaning to throw away, duplicate purchases of things you already had, and at least one item you genuinely cannot identify, you are not alone. The kitchen pantry is one of the most consistently cluttered spaces in the American home, and most households let it reach a point of genuine dysfunction before deciding something needs to change.
Knowing how to declutter your kitchen pantry properly is not complicated, but it does require a clear process and honest decision-making about what is actually earning its space on your shelves. Done correctly, learning how to declutter your kitchen pantry transforms one of the most frustrating storage areas in your home into one of the most functional, and the results are felt every single time you cook a meal or write a grocery list.
This guide walks you through exactly how to declutter your kitchen pantry from start to finish, covering every type of item you will find, every decision you will need to make, and the habits that keep it organized long after the initial work is done.
Why Your Pantry Gets Cluttered and Stays That Way
Before getting into how to declutter your kitchen pantry step by step, it helps to understand why pantry clutter is so persistent. Most people who have a cluttered pantry are not disorganized people. They are people facing a specific set of conditions that make pantry clutter almost inevitable without a deliberate system to prevent it.
The first condition is that grocery shopping happens regularly but pantry assessment almost never does. Food comes in every week without a corresponding process for evaluating what is already there. Items get pushed to the back when new purchases are placed in front. The back of the pantry becomes a graveyard of purchases made weeks or months ago that are now expired, forgotten, or buried behind things purchased more recently.
The second condition is that pantry items are invisible most of the time. When the pantry door is closed, the clutter disappears. Unlike a messy counter that generates daily frustration and therefore daily motivation to address it, a cluttered pantry only becomes a problem when you open the door and cannot find what you need, or when you buy something at the grocery store and discover you already had three of the same thing at home.
The third condition is that food feels different from other categories of household items. Discarding a non-food item feels like a clear decision. Discarding food, even food that is expired or that you know you will never use, feels wasteful in a way that makes the decision harder than it logically should be.
Understanding these three conditions is the foundation of knowing how to declutter your kitchen pantry effectively because each one has a specific solution that makes the process easier and the results more durable.
What You Need Before You Start
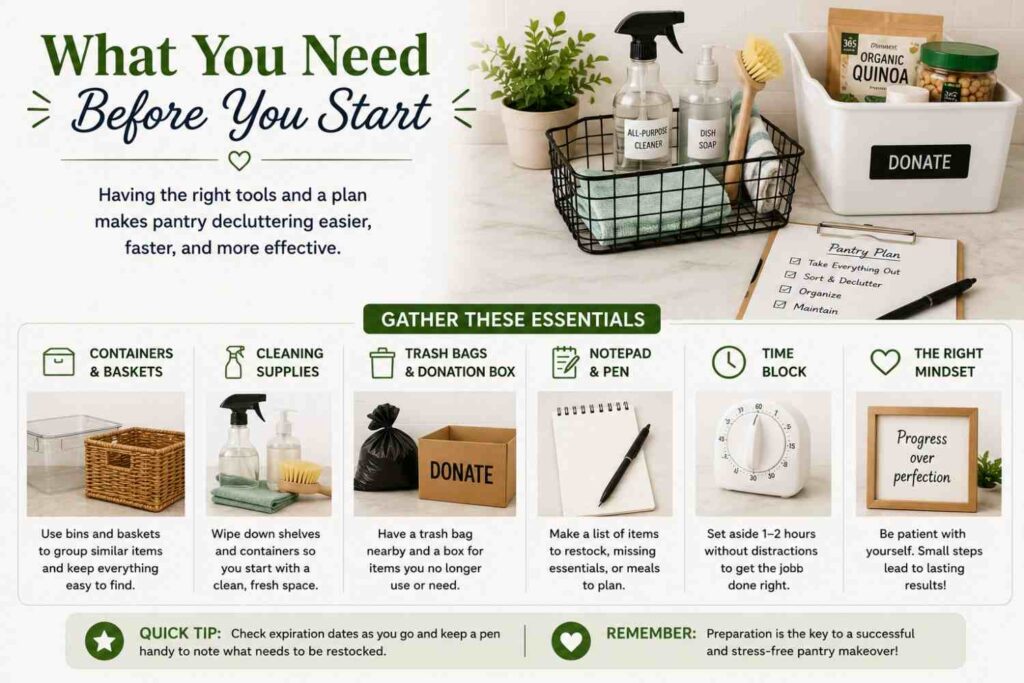
Learning how to declutter your kitchen pantry starts before you open the first cabinet door. Having the right setup before you begin makes the process faster and prevents the common problem of stopping mid-session because you ran out of trash bags or have nowhere to put the items leaving the pantry.
You will need several large trash bags for expired and unusable items, boxes or bags for food bank donations of unexpired items you will not use, a damp cloth or all-purpose cleaner for wiping down shelves once they are empty, and a temporary surface like the kitchen table or a cleared counter where you can place items as you remove them from the pantry.
You will also need a permanent marker for labeling items and noting dates, and if you plan to purchase any organizational products after decluttering, a notepad for recording what you actually need based on what remains rather than guessing before you start. Buying organizational bins before you how to declutter your kitchen pantry almost always results in purchasing the wrong sizes or quantities. Always declutter first and organize second.
Set aside a realistic block of time. For most households, learning how to declutter your kitchen pantry takes between one and three hours depending on the size of the pantry and how long it has been since it was last properly addressed. Do not start the process if you do not have enough time to finish it in one session. A partially decluttered pantry with everything pulled out and not yet returned is worse than the original problem.
Step One: Empty the Pantry Completely
The single most important step in how to declutter your kitchen pantry is to remove everything from every shelf before making any decisions about what stays. This is the step most people skip because it feels like unnecessary work, and it is the reason most pantry decluttering sessions produce temporary results rather than lasting ones.
When you remove everything and see the full contents of your pantry laid out on the counter or table at once, the situation becomes clear in a way it never is when you are looking at items one at a time on a shelf. The three cans of the same soup become visible. The four boxes of pasta in various stages of being opened become a single decision rather than four separate ones. The items you forgot you had appear from the back of the shelf where they have been invisible for months.
As you remove items, wipe down each shelf before moving to the next. A pantry that has been emptied for decluttering is the perfect opportunity to clean the shelves that have been accumulating dust, crumbs, and food residue since the last time anything was removed from them. Starting fresh with clean shelves makes the reorganization feel genuinely new rather than just a rearrangement of the same space.
Group similar items together on the counter as you remove them. All canned goods together, all grains and pasta together, all baking supplies together, all snacks together, all condiments and sauces together. This grouping is the foundation of how to declutter your kitchen pantry effectively because it makes duplicates visible and gives you a clear picture of the full quantity of each category before you make any decisions.
Step Two: Check Every Expiration Date
Checking expiration dates is the most straightforward part of how to declutter your kitchen pantry and often the most surprising. Most households discover when they how to declutter your kitchen pantry that a meaningful portion of their pantry contents are expired, sometimes by months and occasionally by years.
Check the expiration date on every single item. Best by, use by, and sell by dates all have slightly different meanings but as a practical rule when you how to declutter your kitchen pantry, any item past its printed date goes into the trash bag. Do not set it aside to consider. Do not decide it is probably still fine. Discard it and move forward.
The USDA (https://www.usda.gov/foodsafety) provides clear guidance on food date labels and what they mean for safety versus quality. Best by and sell by dates primarily indicate quality rather than safety for shelf-stable products, meaning some items past these dates are still safe to consume but may have reduced quality. Use by dates are more directly related to safety and should be treated with more caution. When in doubt about whether an expired item is still safe, discard it. The mental energy spent debating whether something is still acceptable is not worth the pantry space it is occupying.
Spices and dried herbs deserve specific attention when you how to declutter your kitchen pantry because they are easy to overlook and have a shorter effective lifespan than most people assume. Ground spices retain their potency for about two to three years, and whole spices for three to four years. Spices past these ranges are not unsafe but are so diminished in flavor that they contribute nothing to cooking. If your spice collection includes jars from several years ago, this is the time to address it.
Step Three: Identify What You Will Not Use
Checking expiration dates removes the items that should not be eaten. The next step in how to declutter your kitchen pantry is identifying the items that are not expired but that you are genuinely not going to use. This step requires more honesty than checking dates but is equally important for how to declutter your kitchen pantry effectively.
The category of items purchased for a recipe made once and never repeated is one of the largest contributors to pantry clutter in most households. The specific grain purchased for a dish tried one time. The specialty sauce bought for a recipe that seemed interesting and was never made again. The baking ingredient used for a holiday project two years ago and never touched since. These items are not expired, they are not unusable, but they are realistically never going to be used by your household. When you how to declutter your kitchen pantry honestly, these items belong in a food bank donation bag rather than back on your shelves.
The same applies to items purchased without checking what was already at home. The canned goods bought because you could not remember if you had any, added to a shelf that already had four of the same item. The extra bottle of olive oil purchased before the current one was finished. These duplicates in excess of what you can realistically use before they expire are candidates to donate when you how to declutter your kitchen pantry.
Feeding America (https://www.feedingamerica.org) operates a network of food banks across the United States that accept unexpired non-perishable food donations. Most local communities also have food pantries or church-based food programs that accept donations directly. Donating usable food you will not use is one of the most direct ways to ensure that your pantry decluttering work benefits someone else rather than simply filling a trash bag.
Step Four: Assess Your Storage Containers and Packaging
When you how to declutter your kitchen pantry after removing expired and unwanted items, take a moment to assess how items are stored before returning them to the shelves. Original packaging is often inefficient for pantry storage and contributes to the difficulty of seeing what you have and accessing what you need.
Open bags of flour, sugar, rice, and other dry goods that have been resealed or folded over take up significantly more space than they need to and are also more susceptible to moisture, pests, and spills than sealed containers. Transferring frequently used dry goods to clear airtight containers when you how to declutter your kitchen pantry makes the contents visible at a glance and makes the shelves significantly easier to maintain.
Clear containers are particularly useful because they eliminate the need to pull items forward to see what is in them or how much remains. When your flour container is transparent, you can see from across the kitchen whether it needs to be restocked before you run out mid-recipe.
Label every container clearly with the contents and if applicable the date it was filled. This practice becomes especially important when items are stored in containers that do not allow the original packaging to be seen. The FDA (https://www.fda.gov/food/buy-store-serve-safe-food/safe-food-storage) recommends proper labeling of all food storage containers as a basic food safety practice that prevents confusion and reduces food waste.
Do not purchase any containers before you finish the full how to declutter your kitchen pantry process. Only after everything has been sorted, expired items discarded, unwanted items donated, and remaining items assessed do you have an accurate picture of what storage solutions would actually help. Purchasing containers before this point almost always results in wrong sizes, wrong quantities, or solutions for problems that would have been eliminated by the decluttering itself.
Step Five: Return Items With a Clear Organization System
Returning items to the pantry after you how to declutter your kitchen pantry is where the lasting organizational improvement is built. The difference between a pantry that stays organized and one that returns to clutter within weeks is almost entirely determined by whether items are returned with a logical system or simply placed back in a random arrangement.
Group items by category and keep each category together in a consistent location. All canned goods in one section, all baking supplies in another, grains and pasta together, snacks in a designated area, condiments and sauces together. When categories have consistent locations, putting items away correctly after grocery shopping takes no thought, and finding items during cooking takes no searching.
Place the items used most frequently at eye level and within easy reach. The canned tomatoes you use weekly belong in a more accessible location than the specialty item used once a season. Frequency of use should drive placement decisions when you how to declutter your kitchen pantry, with the most-used items getting the best real estate and less-used items taking higher or lower shelves.
First in first out is the inventory management principle used in commercial kitchens and it applies directly to how to declutter your kitchen pantry at home. When you add new items to the pantry, place them behind the existing items of the same type so that older items are used first. This single habit prevents the buildup of expired items at the back of shelves and is one of the most effective long-term pantry maintenance practices available.
Taller items go at the back of each shelf and shorter items at the front. This arrangement makes everything visible from the front of the shelf rather than hiding shorter items behind taller ones. When everything is visible, the pantry functions more like an inventory system and less like an archaeological excavation every time you need to find something.
The Zones of a Well-Organized Pantry
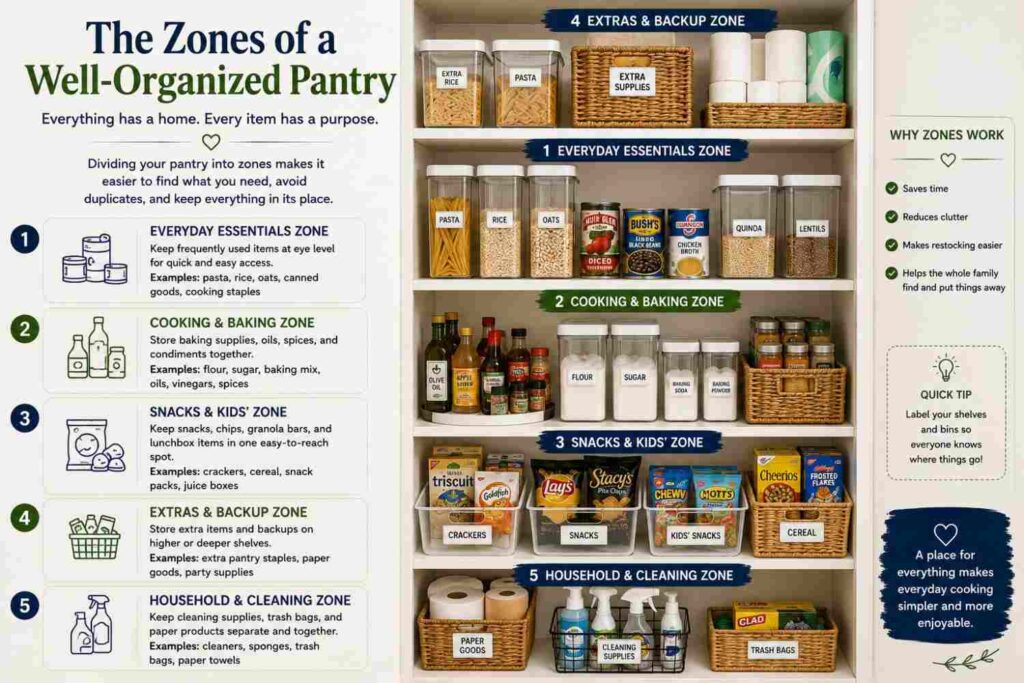
Part of knowing how to declutter your kitchen pantry is understanding how to divide the available space into logical zones that match how the pantry is used. A well-zoned pantry makes putting items away correctly intuitive and finding items quickly effortless.
The eye level zone is prime real estate and belongs to the items used most frequently. For most households this means everyday cooking staples like canned goods, cooking oils, vinegars, and the grains or pasta used regularly. Everything in this zone should be something reached for at least weekly.
The zone above eye level is appropriate for items used less frequently, including baking supplies for households that bake occasionally rather than daily, specialty items used for specific occasions, and backup stock of pantry staples not yet opened. These items do not need to be immediately accessible but should be reachable without a step stool for the primary users of the kitchen.
The lower zone below eye level works well for heavier items including large bags of rice or flour, cases of canned goods in backup quantity, and items stored in larger containers. Heavier items stored lower are safer to access than heavy items stored at height.
The floor of a walk-in pantry, if space allows, is appropriate for large appliances stored in the pantry, bulk items in sealed containers, and items that are used infrequently enough that floor storage is appropriate. Keep the floor clear enough that it can be swept without moving everything, which supports the maintenance habits that keep a decluttered pantry from returning to its original state.
How to Keep Your Pantry Decluttered After You Finish
The work of how to declutter your kitchen pantry is most valuable when it produces lasting results rather than a one-time improvement that gradually reverses. The habits below are what determine whether the organized pantry you have created stays that way.
Do a quick pantry check before every grocery trip. Opening the pantry and spending sixty seconds looking at what you have before leaving for the store prevents duplicate purchases and helps you identify what actually needs to be restocked rather than what you are in the habit of buying. This single habit is responsible for more ongoing pantry organization than any physical organizational system.
Rotate stock every time you add new items. New purchases go behind existing items of the same type. This takes ten extra seconds per item and prevents the expiration problem that made the initial how to declutter your kitchen pantry session necessary in the first place.
Do a full pantry reassessment every three to six months. This does not need to be as comprehensive as the initial how to declutter your kitchen pantry session. It is a thirty to sixty minute check of expiration dates, identification of items that have gone unused since the last assessment, and a reorganization of anything that has drifted from the system established during the initial declutter.
The pantry that works best for daily cooking is not the one with the most storage space or the most elaborate organizational system. It is the one where everything visible is something you actually use, everything is accessible without moving other items to reach it, and the organizational logic is simple enough that everyone in the household can maintain it without thinking. That is what a properly executed how to declutter your kitchen pantry process produces, and it is worth every minute of the effort required to get there.