Transforming a small bathroom with vinyl plank flooring is like crafting a masterpiece in a jewel box—every detail must sing. This guide unveils avant-garde techniques, futuristic tools, and insider secrets to install vinyl wood flooring, vinyl laminate flooring, or luxury vinyl plank flooring with unparalleled flair. Forget cookie-cutter tutorials; we’re diving into a world of vinyl plank artistry, blending cutting-edge technology with creative hacks to make your bathroom a functional showpiece that defies its compact footprint.
Why Vinyl Plank Flooring Shines in Small Bathrooms
Vinyl plank flooring redefines small-space design with its water-resistant, durable nature and stunning wood-like visuals. Luxury vinyl plank flooring, like COREtec’s Stone+ collection, uses a limestone-based core for unmatched stability in humid bathrooms. Vinyl wood flooring offers hyper-realistic oak or walnut textures, while vinyl laminate flooring delivers budget-friendly elegance. Its click-lock or adhesive systems allow for DIY-friendly installation, but the magic lies in unconventional approaches that elevate the outcome beyond standard expectations.
Pre-Installation: Setting the Stage for Brilliance
Before laying a single vinyl plank, treat preparation as a ritual. Acclimate planks for 72 hours in the bathroom’s exact humidity (use a digital hygrometer to confirm 40–60% RH) to prevent post-installation warping. Map your layout with a 3D room scanner app, like RoomScan Pro, to visualize patterns like chevron or basketweave, which add dynamism to small spaces. For a 5×7-foot bathroom, choose 8-inch-wide vinyl wood flooring planks to trick the eye into perceiving more space.
Test the subfloor with a moisture meter (aim for <12% moisture content on concrete) and use a digital laser level to detect slopes. Correct unevenness with a graphene-enhanced self-leveling compound, which sets faster and stronger than traditional mixes. For wood subfloors, install a recycled cork underlayment—it’s eco-friendly, sound-dampening, and perfect for luxury vinyl plank flooring. Undercut door jambs with a flush-cut saw and remove baseboards, preserving them for reinstallation with a magnetic stud finder to avoid pipe damage.
Tools: The Future of Installation
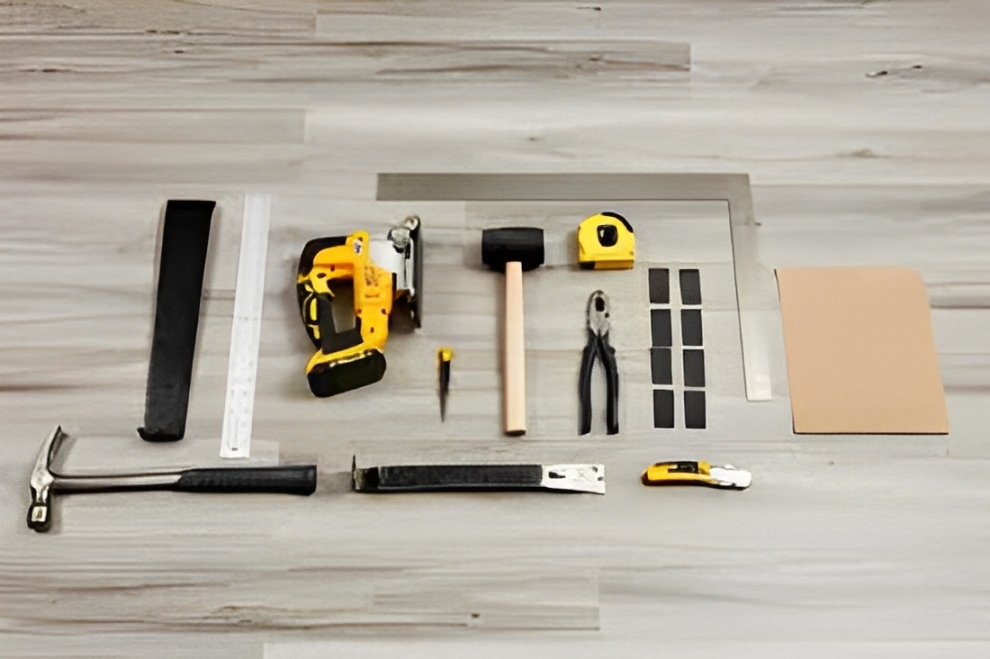
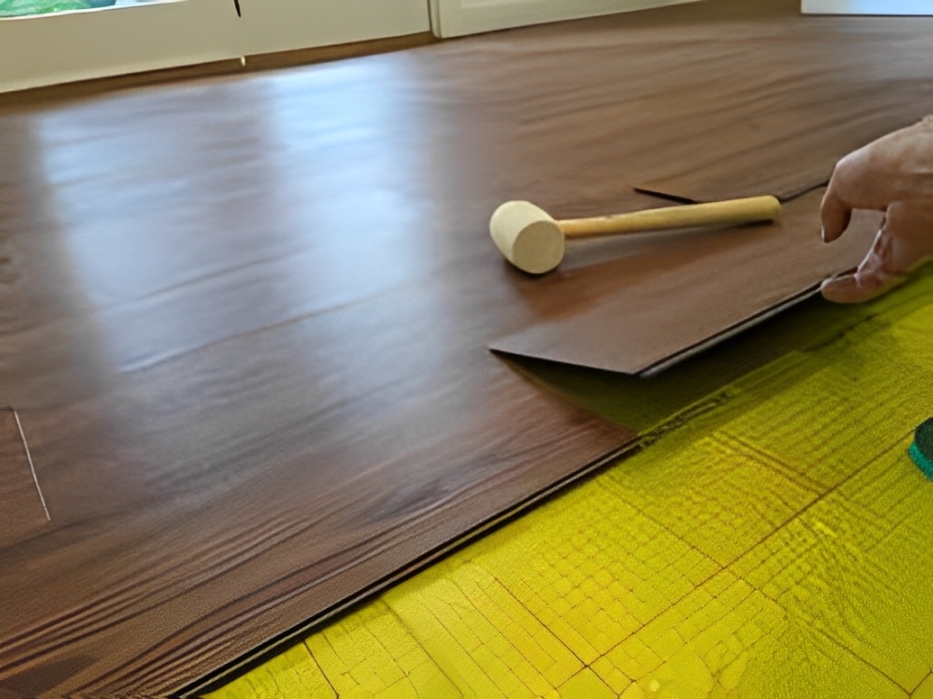
Ditch outdated tools for next-level precision. A CNC-guided vinyl cutter, like the Silhouette Cameo, ensures intricate cuts around fixtures with surgical accuracy. Pair it with a thermal imaging camera to detect subfloor cold spots that could affect adhesive bonding. For glue-down vinyl laminate flooring, use a nano-adhesive applicator for ultra-thin, even glue lines. A vibration-dampening tapping block ensures click-lock vinyl plank joints snap together without gaps. Invest in a smart tape measure with Bluetooth syncing to log measurements directly to your phone, minimizing errors in tight spaces.
Installation: Art Meets EngineeringInstallation: Art Meets Engineering
1. Designing a Showstopper Layout
Start with a holographic layout projector to preview your vinyl plank pattern on the floor—diagonal layouts elongate narrow bathrooms, while parquet adds sophistication. Stagger seams by 8 inches for vinyl wood flooring, using a randomized offset algorithm (available in apps like FloorPlan) for organic flow. Snap a glow-in-the-dark chalk line for perfect alignment, visible even in low-light bathrooms.
2. Cutting with Precision
Cut luxury vinyl plank flooring with a laser-guided miter saw for clean edges, keeping the decorative side up to avoid splintering. For curves around toilets, use a 3D-printed template scanned from the fixture base for a glove-like fit. Soften vinyl plank edges with a low-wattage heat wand to make intricate cuts pliable. Number each cut piece with removable UV-fluorescent tape to streamline reassembly in complex layouts.
3. Mastering Obstacles
In small bathrooms, fixtures demand creativity. Install vinyl wood flooring under toilets by removing the fixture and using a flexible caulk dam to seal gaps, preventing water ingress. For vanities, employ a digital contour gauge to trace curves, then cut with a rotary tool fitted with a diamond blade for glass-smooth edges. Transition to adjacent rooms with magnetic transition strips that snap into place, matching the vinyl laminate flooring’s grain for continuity.
4. Finishing with Flair
Install smart baseboards with embedded LED lighting to illuminate vinyl plank flooring, enhancing the bathroom’s ambiance. Seal edges near wet areas with nano-sealant caulk, which bonds molecularly to prevent leaks while remaining flexible. For luxury vinyl plank flooring, apply a UV-cured topcoat post-installation to boost scratch resistance and add a subtle sheen, mimicking high-end hardwood.
Unconventional Hacks for Stunning Results
- Augmented Reality Guides: Use AR apps like MeasureKit to overlay cut lines on vinyl plank, ensuring precision around pipes or vents.
- Vibration Sensors: Attach a mini vibration sensor to your tapping block to detect loose click-lock joints, ensuring a rock-solid floor.
- Bioplastic Spacers: Use biodegradable spacers for expansion gaps, reducing environmental impact while maintaining the 1/8-inch clearance needed for floating vinyl wood flooring.
- Scented Underlayment: Opt for lavender-infused underlayment to release a subtle fragrance in humid bathrooms, enhancing the sensory experience.
Pitfalls to Dodge
- Skipping Thermal Mapping: Use a thermal camera to avoid cold spots that weaken adhesive in vinyl laminate flooring.
- Over-Adhering: For glue-down installations, let adhesive tack up for 15 minutes to prevent vinyl plank slippage.
- Neglecting Edge Sealing: Unsealed edges in wet areas can lift luxury vinyl plank flooring; always use a silicone-based nano-sealant.
Maintenance: Preserving the Magic
Protect vinyl plank flooring with felt pads under furniture and microfiber entry mats to trap grit. Clean with a plasma-activated water spray, which neutralizes bacteria without chemicals, safe for vinyl wood flooring. Every three years, apply a graphene-based polish to luxury vinyl plank flooring for enhanced durability and a mirror-like finish.
Conclusion: Craft Your Vision
Installing vinyl plank flooring transforms small bathrooms into stylish, resilient havens. By embracing futuristic tools, eco-conscious materials, and bold design choices, your vinyl wood flooring, vinyl laminate flooring, or luxury vinyl plank flooring will redefine the space. This isn’t just flooring—it’s a statement of innovation and artistry.